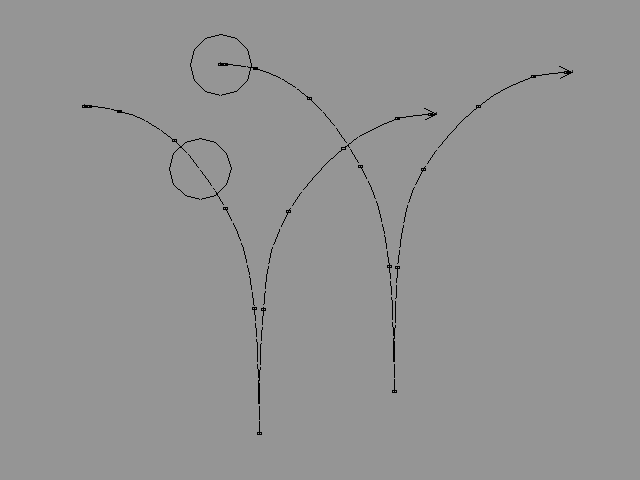
6.1.3 Bouncing SphereAs you have probably already noticed, the PATH method can produce accelerations and decelerations according to distances between subsequent knot points of the parameter curve used longer the distance for defining the motion. The between subsequent knots, the higher the speed and vice versa. This example shows one advantage of the Real's animation system: all information needed for animating objects is a natural part of the object itself. When duplicating an object (e.g. bouncing sphere), all animation data will be duplicated as well, ie. the result will be two bouncing spheres. Bouncing spheres (or any other animated objects) can be saved and loaded back and they still continue "bouncing". To create a bouncing sphere: 1. Create one sphere to the top left edge of the window. 2. Now we define a motion for the sphere, as shown in the following picture. Select the function Animate/Create/Path and draw a B-Spline control polygon curve, which defines the motion for the sphere. By creating triple points, it is possible to define zero speeds; therefore, click the three first control points to the center point of the sphere so the speed of the sphere in the beginning will be zero. The deeper the sphere falls, the higher the speed ie. longer the distance between the control points should be. Finish the curve by <RMB> click. 3. REAL 3D creates a level under which it puts the sphere and the method with its parameter path. Rename the new level object as "Boing". |
 YouTube Figure T6-3: Bouncing Sphere. The higher the distance between the knots the higher the speed. |
|
4. Now your have created a bouncing sphere which consists of a actual sphere primitive and one PATH method. Play it and it bounces. 5. Animate/Control/Play_Backwards the animation. 6. Now, duplicate the "Boing" object, move it a bit and play the animation. The result is two bouncing spheres. 7. When you played the animation, both spheres started to move immediately and they reached the end points of their paths at the end of the animation. However , this can be changed by defining start and end times for methods. Select the method moving the first sphere, select Modify/Properties/Animation and activate Start and End gadgets. Change end time from its default (1) to 0.7. This means that the method starts to work immediately but stops when the time reaches 0.7. Do the same for the method of the second sphere, but now use values Start=0.4, End=1.0. Play the animation and the spheres bounce. |
| ghh don'tpanic |