6.11.3 Interactively Controlled Hierarchical SkeletonsThis example demonstrates how to create a hierarchical skeleton, and how to control it interactively using inverse kinematics. It is not difficult to find examples of hierarchical skeletons. Just look at your hand and you can see one example. The ability to fork one skeleton to several sub-skeletons is often needed, especially when creating character animations. Actually, great deal of power provided by skeletons is based on this feature. So, how to create hand-like hierarchical skeletons? The answer is simple: skeletons can be targets to another skeletons. So, lets examine how to create such a hierarchical skeleton object and how it can be controlled and modified. 1. Create a polygonal line (Create/Controls/Open Line) consisting of three points representing your arm: shoulder, elbow, wrist. 2. Create an arm using the Conical Tube tool. Snap the joints of the tube to the points of the polygon using dragging, to get perfect matching. 3. Create a SKELETON method under the tube object so that all primitives of the tube will be targets for the method. Use Cut and Paste to move the skeleton line under the method. Also create the secondary skeleton (Controls/Axis). Later, we will rotate the secondary skeleton to make the robot rotate its wrist. 4. Select Animate/Control/Refresh and now the arm is fixed to the skeleton. Select the skeleton curve and use Modify/Special/Inverse Kinematic to modify it. Refresh the animation system again, just to make sure that the skeleton really works. Note that if you have installed the default key-bindings, you can use hot keys to do that. This makes the interactive handling of skeletons much more convenient compared to corresponding menu selections. 5. Select Modify/Structure/Copy while the entire arm object is selected. We are going to create all fingers by duplicating and scaling the arm. 6. Create a new level object at the same level with the SKELETON method and rename it as "fingers". Make it the current level. 7. Select the menu Modify/Structure/Paste. Modify the pasted arm smaller so that it represents a finger. 8. Create the second and third fingers by duplicating and rotating the first one. 9. Now, set the value of tag ISKE associated with the SKELETON method controlling the arm to 0. This tells REAL 3D that the situation is changed, and the information of the relationship between the targets and the skeleton should be redefined. Select the menu Animate/Control/Refresh and your "Robot Arm" is complete. |
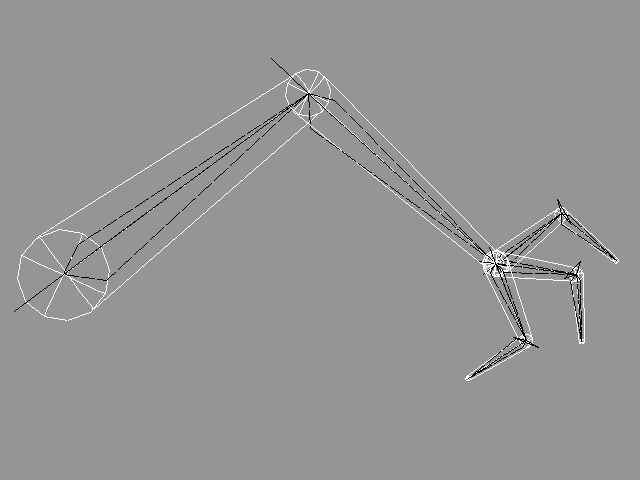 Figure T6-34: A simple robot arm. Skeletonally controlled fingers are sub-objects of skeletonally controlled arm. |
|
After practising this a couple of times, it should not take more than a minute or two to build up this kind of hierarchical robot arm. So, let's have a look how this arm can be controlled by using inverse kinematics (naturally you can use all normal modify/animation functions to manipulate it, too). In order to move its wrist to another place, just select the skeleton line used for controlling the upper arm and the forearm and move its end-point with the Modify/Special/Inverse Kinematic modification, then select Animate/Control/Refresh and the arm, including all fingers, is pulled back to the skeleton. If you want to define a new position for a finger-tip, just select the skeleton line used for controlling the finger in question, use Modify/ Special/Inverse Kinematics and refresh the animation system. In order to define the same position for all finger-tips, select the "fingers" object (in other words, the object containing all the fingers), and use Modify/Inverse Kinematics etc. But how to rotate the wrist of the arm? Select the secondary skeleton curve of the skeleton method controlling the arm and rotate it using any suitable function. Refresh the animation system and fingers are rotated accordingly. As you already noticed, the inverse kinematics function always modifies the end point of the skeleton. So how to define a position for the other end? Just swap the direction of the skeleton using the function Modify/ Freeform/Swap Direction, use inverse kinematics and swap the direction back. We will need this arm in the next example, so don't delete it yet. |
| ghh don'tpanic |